Building a Visual Similarity Search
Published:Contents
- Introduction
- Motivation
- What’s an image search?
- Technology pipeline for image search
- Demo and results
- BONUS: Building with LLMs, observations
- What’s next?
1. Introduction
I recently gave a lightning talk at the SLO AI event on how to build a visual similarity search from scratch. Its description says:
/…/ a hands-on demo on building a visual similarity search system using a modern stack. We'll explore whether an image can be used to identify a person or object across other images, and discuss the technology that makes it possible.
My slides can be found here (PDF), or you can find an example repository hosted as a 🤗 HuggingFace space, but I’ve also decided to write about it, because…
We do not write in order to be understood; we write in order to understand.
– C. Day‑Lewis

2. Motivation
This year I built RideShots.cc, which is a marketplace where you find your photos using a selfie. Its facial recognition works incredibly well, see an example below:
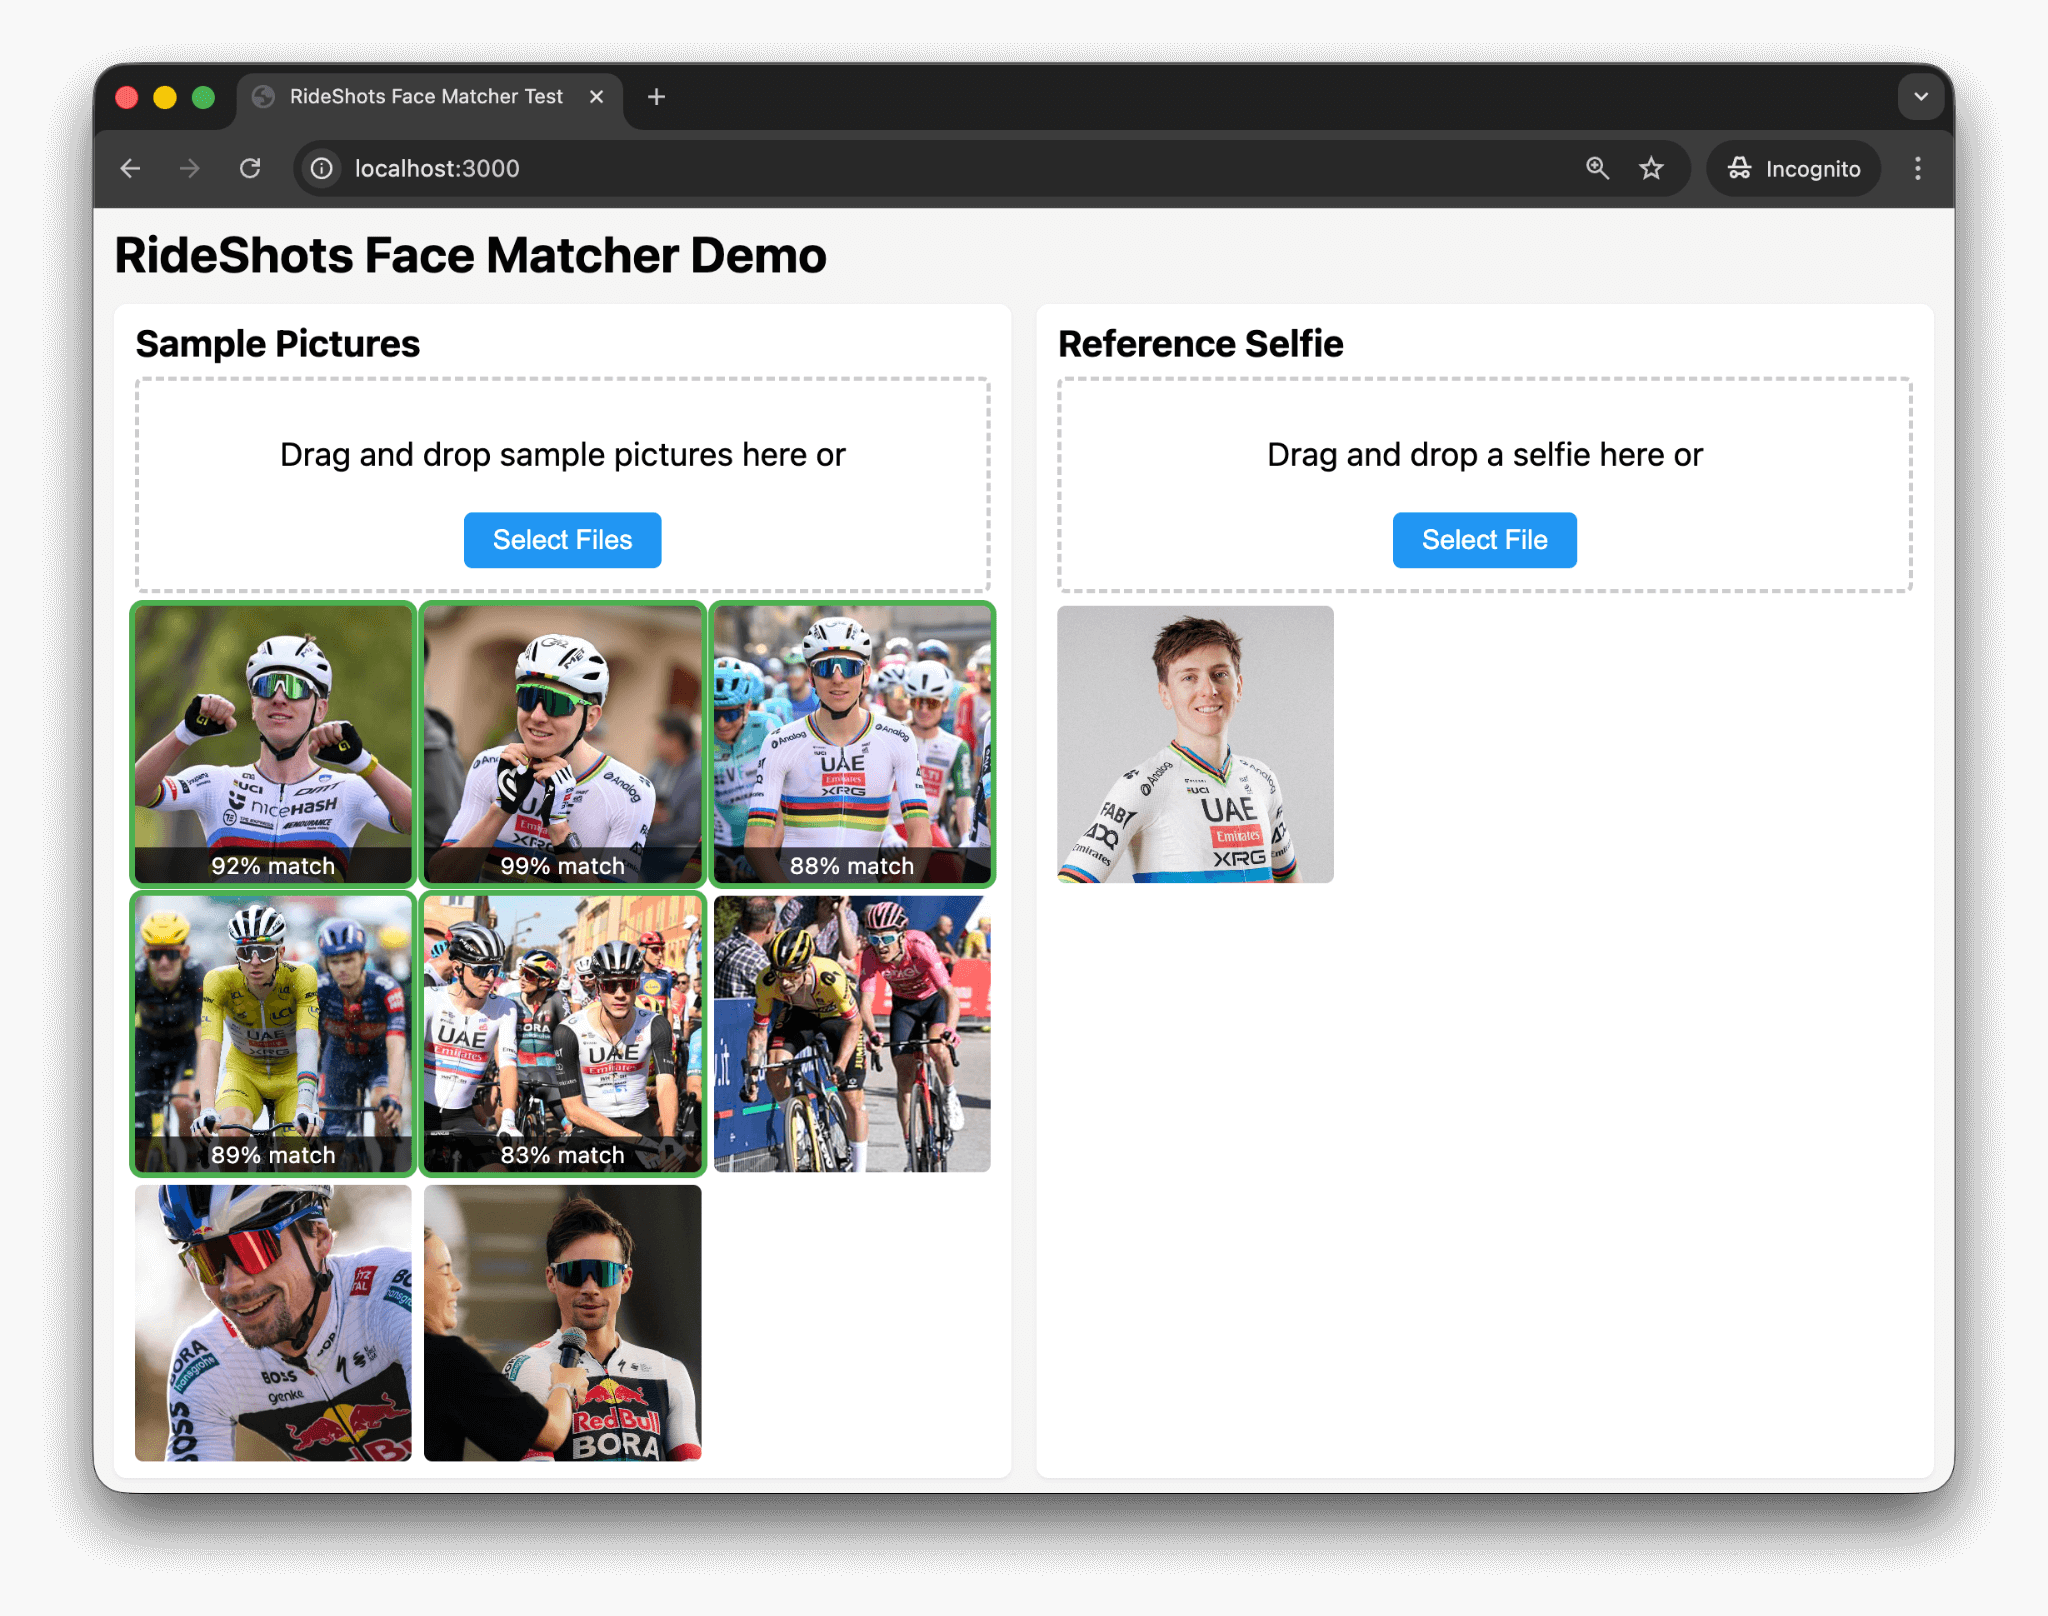
On the right-hand side we see a face of Tadej Pogačar, and RideShot’s system correctly recognized him on 5 sample photos. What’s remarkable is that it finds him on photos where he’s wearing a helmet and sunglasses, and even on one where – at a quick glance – I wasn’t sure it’s him. And just to show that these aren’t false positives, I’ve added some photos of Primož Roglič, where there’s no match ✓.
For RideShots, I’m borrowing technology from Amazon. It works incredibly well, but it's a bit of a black box. As a curious person, I wanted to understand how all of this *actually* works, so this is where my rabbit-hole path into image similarity begins.
3. What’s an image search?
Before we dive into the technology that makes image search possible, let’s first explore types of image search which serve different purposes, for example:
- text to image search (like Google Images, Bing Images),
- reverse image search (think TinEye, Google Lens or Bing Visual Search),
- visual similarity search (e.g. find similar products on eCommerce websites),
- object recognition search (Pinterest or Google Lens are a good example),
- facial recognition image search (RideShots.cc example).
Another good example of image search is in Apple’s Photos, which combines on-device machine learning to:
- detect scenes and items (cars, dogs, beaches, etc.),
- recognize and group faces,
- extract text via OCR,
as well as traditional metadata parsing to extract GPS coordinates and timestamps.
Let’s take a look at two examples why image search might be tricky:
What seems similar to us, may not be to others
Consider these three photos. Which two photos are more similar?

Is it the first two, or the second and the third?

One could argue that the middle photo is more similar to the first or the last, and they’d both be correct answers. It depends on whether you’re a car person or you’re marveling at the architecture.
Both Google Lens and Pinterest are aware of this caveat of image search, and their solution is an user interface allowing you to pick what you’re interested in:
4. Technology pipeline for image search
As explored in the previous chapter, there are different types of image search, each requiring its own technical approach. In this article, I build a system that automatically detects objects in images — specifically a dress — and retrieves similar dresses from a database.
A high-level overview of the system is:
- getting the data,
- detect an object,
- remove everything else from the image,
- turn it into a vector,
- store it in a (vector) database.
4.1. Data
Before we move on to technology, it’s important to note that the product images in this demo are used for educational/demo purposes only, and are the property of their owners, Zara. When I was exploring material for this research, their images stood out. I made a calculated guess that Zara would not mind if I “borrow” 1818 images of their 231 products for educational purposes. If I’m mistaken, and Zara reaches out with a complaint, I’ll replace this example with inferior data set.
One of the reasons I preferred Zara’s photos over alternatives is that their dresses had on average 8 photos. Half of them were on a model and the other half was a dress itself. Many of the model shots were particularly interesting, as they were often taken on the streets in spontaneous conditions and locations.
This was exactly what I wanted for this demo. It made for a nice challenge: searching with an image of a model wearing a dress where the dress itself might not be fully visible (e.g., a side or back shot), or if the dress wasn’t fully in the frame. Here's a few examples:
- ASYMMETRIC BEADED SATIN EFFECT MIDI DRESS
- SOFT FABRIC DRESS WITH CONTRAST DESIGN
- LONG OPEN-BACK DRESS
Note: when storing vectors for search/comparison, I used all product images except the first one. The first product photo was reserved as a “query photo”, which means that the exact query photo was never part of the vector index.
4.2. Object detection
In this step, a machine learning model needs to determine what’s on the photo (classification) and where it is (localization). Model response are bounding box coordinates, class labels and a confidence score.
For this task, I first tried traditional object detection models, like YOLOv8, yet somehow I wasn’t entirely happy with results – it just wasn’t great for detecting clothes from my dataset. If I wanted to dedicate a bit more time to this task, I would either try to find a suitable pre-trained model or obtain fashion datasets to train a model myself, which, in the case of YOLO, is relatively easy.
At the end, I went ahead with Florence-2 (base model) by Microsoft, which uses a vision-language transformer architecture based on DETR, a modern transformer approach to object detection.
Florence-2 is available as a pre-trained model through HuggingFace transformers, a popular Python library for machine learning shenanigans. Here's a pseudocode approach:
# Object Detection: Finding the dress in the image
# ================================================

from transformers import AutoProcessor, AutoModelForCausalLM

processor = AutoProcessor.from_pretrained("microsoft/Florence-2-base")
model = AutoModelForCausalLM.from_pretrained("microsoft/Florence-2-base")

def detect_clothing(image):
    od_task = "<OD>" # Object Detection

    inputs = processor(text=od_task, images=image, return_tensors="pt")
    detections = model.generate(**inputs)
    parsed = processor.post_process_generation(
        detections, task=od_task, image_size=(image.width, image.height)
    )

    bbox  = parsed['<OD>']['bbox']
    label = parsed['<OD>']['label']

    return None if label not in ['dress', 'shirt', 'pants', 'jacket', ...]:

    return {'name': label, 'bbox': bbox}
After a successful object detection <OD> task,
we get the bounding boxes of a garment, so we can move on to the next task.
4.3. Segmentation and background removal
In this step, I used Meta's SAM2 model. SAM stands for Segment Anything Model, and it helps us obtain a detailed mask of the garment. This allows us to remove any non-clothing pixels from the image's bounding boxes — backgrounds, skin, walls, or other objects that would otherwise introduce noise and decrease the accuracy of our image similarity comparisons.
One of my attempts was to use rembg, which is a more general background removal tool but unfortunately, often removed too much or too little. It also didn’t work well with multiple garments, for example, whenever a dress had a belt, it failed to correctly perform the background removal.
Note: after carefully reading rembg’s documentation (and not trusting Cursor and its LLM-driven development), I realized it supports several models, including SAM. Knowing this, I might simplified the code by removing SAM2 as a dependency and use rembg's SAM integration instead.
But I didn't and here's my pseudocode approach:
# Segmentation & Background Removal: Isolating the dress
# =======================================================

from transformers import Sam2Model, Sam2Processor

sam2_processor = Sam2Processor.from_pretrained("facebook/sam2-hiera-large")
sam2_model = Sam2Model.from_pretrained("facebook/sam2-hiera-large")

def segment_clothing(image, bbox):
  inputs = sam2_processor(
    images=image,
    input_boxes=[[[bbox[0], bbox[1], bbox[2], bbox[3]]]],
    return_tensors="pt"
  )
  outputs = sam2_model(**inputs, multimask_output=False)
  processed_masks = sam2_processor.post_process_masks(
    outputs.pred_masks.cpu(),
    inputs["original_sizes"]
  )
  return processed_masks[0][0][0].numpy() > 0  # Pick best mask

def remove_background(img, mask):
  original_rgb = np.array(img)
  bg_removed = np.zeros((img.height, img.width, 4)) # Transparent image

  for y in range(img.height):
    for x in range(img.width):
      if mask[y, x]: # If mask is True, keep pixel
        bg_removed[y, x] = [*original_rgb[y, x], 255]

    return PILImage.fromarray(bg_removed, 'RGBA')
The result is an image of the garment on a transparent background, as shown below:

Once we have this, we can move on to generating embeddings.
4.4. Embedding
In this step, we turn our isolated garment image into something computers prefer over pretty pictures – a numerical vector. I used FashionCLIP, which is based on CLIP by OpenAI. CLIP is a model that understands both images and text, although in our use case, only images were used. It would be a nice exercise to see if adding text descriptions to an image while embedding them would yield better results. But since I didn’t think of that when I was “borrowing” images from Zara, I’ll leave that to someone else to explore.
Like our previously used models, FashionCLIP is also available on HuggingFace transformers. Here’s the pseudocode:
# Embedding: Turning the image into numerical vectors
# ===================================================

from transformers import CLIPModel, CLIPProcessor

model = CLIPModel.from_pretrained("patrickjohncyh/fashion-clip")
processor = CLIPProcessor.from_pretrained("patrickjohncyh/fashion-clip")

def generate_embedding(garment_image):
  inputs = processor(images=garment_image, return_tensors="pt")
  embedding = model.get_image_features(**inputs)

  return embedding[0].numpy() # Returns: 512-dimensional vector
FWIW, I don’t really know how to show you a vector here. ¯\_(ツ)_/¯
But what I do know is that computers are insanely fast at comparing vectors –
in our case, checking which garments we’ve previously turned into vectors
are most similar to the vector of our query image.
Note: it's important to mention how we did the embedding. If, for example, product X had N photos, e.g. productX_1.jpg, productX_2.jpg… productX_N.jpg, I’ve combined photos from productX_2.jpg to productX_N.jpg into a single vector by averaging their embeddings, creating a more robust representation that captures the product from multiple angles. The first product photo was always intended to be used as a query photo, meaning its vector was never part of our collection.
It would be interesting to explore and compare results if we stored each image as its own vector (multiple vectors per product ID) and then searched differently: retrieve the top 10 most similar vectors and determine which product ID appears most frequently among those results.
Regardless, this leaves us with our last step:
4.5. Search
After converting our clothing collection and a query photo into numerical vectors, we can do the comparison. As (Fashion)CLIP vectors are normalized, we can compare them using NumPy's dot product (which, in this context, acts as a cosine-similarity score – telling us how similar our vectors are).
For this demo, our entire vector index is stored in-memory, but if you’re considering stepping up, maybe search for something like FAISS or Milvus. For the sake of simplicity and code readability, I did not.
# Search: Finding similar embeddings
# ===================================

import numpy as np

class SimpleVectorIndex:
  def __init__(self):
    self.embeddings, self.product_ids = []

  def insert(self, product_id, embedding):
    self.embeddings.append(embedding)
    self.product_ids.append(product_id)

  def search(self, query_embedding, k=5):
    # CLIP embeddings are already normalized, so we can compute
    # cosine similarity directly via dot product
    similarities = np.dot(self.embeddings, query_embedding)

    # Get top-k most similar products
    top_k_indices = np.argsort(similarities)[::-1][:k]

    results = []
    for idx in top_k_indices:
      results.append({
        'id': self.product_ids[idx],
        'similarity': float(similarities[idx])
      })

    return results
If we were to do a pipeline recap, it’s in our next chapter.
4.6. Pipeline recap
Detection → segmentation & background removal → embedding → comparison.
# Visual Similarity Search Pipeline
# =================================

def process_image(image):
  """Process image: detect → segment → remove background → embed"""
  detection = detect_clothing(image)
  mask = segment_clothing(image, detection["bbox"])
  garment = remove_background(image, mask)
  return generate_embedding(garment)

# OFFLINE: Build product index
vector_index = SimpleVectorIndex()
for product in load_products("data/products.json"):
  embedding = process_image(Image.open(product["images"][0]))
  vector_index.insert(product["id"], embedding)

# CLIENT: Search for similar products
query_embedding = process_image(Image.open("upload.jpg"))
similar_products = vector_index.search(query_embedding, k=5)
5. Demo and results
Demo can be found on
🤗 HuggingFace.
Unfortunately, it works much slower than on my local machine (Macbook AIR). Duly noted, /me adds "explore peformance optimizations" to the what's next section.
| Result | Count | Percentage |
|---|---|---|
| Found at position #1 | 185/231 | 80.1% |
| Found in top 3 | 203/231 | 87.9% |
| Not found (in top 3) | 28/231 | 12.1% |
The correct product was retrieved as the first result in 80.1% of the cases. In 87.9% of the cases, it was found in the top 3 results. And in 12.1% of the cases, it was not found in the first 3 results.
The results are not great, further motivating me to explore:
- different embedding models, or
- adapt a different method as described in embedding notes.
BONUS: Building with LLMs, observations
Note: feel free to skip to the What’s next? section if you're sick & tired reading about LLMs and development.
It might be worth sharing some of my observations while using LLMs to get to the first prototype and build this demo. I’ve used popular tools like Claude Code and Cursor to build this.
Claude Code was used in the exploration phase where I built evaluation systems
to determine which of the models performed well in a certain task.
I’ve reviewed zero code, all I cared about was either results.md that it spit out or an index.html rendering annotated images
where it found objects, or images with removed background.
Using Claude Code felt a bit like managing a rather large team.
Small enough that you’re present at kick-off calls, but big enough you don’t get to
code review everything they do. Surprisingly, Claude Code never ran into an issue
it couldn’t solve on its own, which gained my trust in the results.
After I was happy with the model for each step, I moved on to building a working prototype. This was done in Cursor as I wanted to see the code as well. In my last step, I wanted to really understand the code, and I think I ended up removing 50% of code. A Python script that does most of the processing was close to 800 lines of code, and is now less than 400.
As a result of relying on LLMs, the working prototype had a few imperfections; here are two worth mentioning:
- For one, even though Florence-2, SAM2 and FashionCLIP are all available on HuggingFace’s transformers, it loaded SAM2 from its GitHub repo instead. It could be that the model’s data was dated and by the time of its cut off, it didn’t have information about its availability on transformers.
- Second, at one point I used rembg to remove background (see 4.2. Segmentation and background removal) but its results were rather poor. Had I checked rembg’s documentation myself, I would have noticed that they support several models, including SAM2, but somehow I relied on LLMs to provide me rembg’s documentation, and it did a poor job.
6. What’s next?
This was a quick prototype built out of curiosity to understand how image similarity works. Since it needed a concrete example, I imagined a use case where I take a photo of a person and want to check what they’re wearing. In terms of improvements and next steps, there’s plenty to explore:
- simplify the codebase by using rembg's SAM integration,
- use a fine-tuned YOLOv8 model instead of Florence 2,
- or explore Florence 2’s
<CAPTION>task and combine that with the query, then - explore the impact of text embeddings, and
- use a proper vector database,
- explore peformance and accuracy optimizations,
- [some other steps]
- Profit.
Please get in touch if you know what those other steps are!
Since this talk was presented at a SLO AI event, I got plenty of feedback and some nifty product ideas. Speacial thanks to the SLO AI organizers for making these events possible and for giving me the opportunity to share my learnings with the community.
Got all the way to tne end?
- Interested in the code? Check out the 🤗 HuggingFace repo.
- Care to give me feedback? Leave a comment below, or send me an email.
 Currently